The world of diesel engines is vast and exciting, filled with components that are crucial to performance. Today, we’re diving into the heart of your 7.3 Power Stroke engine to discuss the MAP sensor and how to replace it. In this article, I’ll guide you through the process of changing MAP sensor on your 7.3 PowerStroke.
During a recent installation on our 2002 Ford Excursion, I ran into a common issue – I accidentally broke the end of the MAP sensor. But every mistake is an opportunity to learn, and that’s why I am here today to demonstrate how to replace the MAP Sensor perfectly.

Understanding the MAP Sensor In 7.3 Powerstrokek
Before I jump into the replacement process, let’s first understand the MAP sensor’s role. The MAP Sensor is a vital part of your 7.3 Power Stroke engine, responsible for measuring the pressure within the intake manifold through a vacuum to help the engine control module (ECM) determine the correct air-fuel mixture for optimal combustion. This measurement plays a critical role in determining the engine’s performance. Here’s how it works:
- When there’s more pressure in the intake manifold, it results in lower vacuum levels, leading to a lower voltage output signal from the MAP Sensor.
- Conversely, when pressure decreases in the intake manifold, vacuum levels increase, causing the MAP Sensor to produce a higher voltage output signal.
In essence, the MAP Sensor gauges the airflow through the manifold, which is crucial for optimizing engine performance. It’s often used in place of a Mass Air Flow (MAF) sensor found in gasoline-powered vehicles.
Symptoms of BAD MAP sensors in 7.3 Powerstroke
| Symptom | Description |
|---|---|
| Decreased Engine Performance | – Reduced power and acceleration |
| – Sluggish throttle response | |
| – Poor fuel efficiency | |
| Check Engine Light (CEL) | – Illumination of the check engine light on the dash |
| – Stored trouble codes related to MAP sensor failure | |
| Rough Idle | – Erratic or uneven engine idle |
| – Risk of stalling or inconsistent idle speed | |
| Hesitation and Surging | – Engine hesitates or surges during acceleration |
| Black Smoke from Exhaust | – Excessive black smoke from the exhaust |
| Reduced Fuel Efficiency | – Poor fuel economy due to incorrect air-fuel mixture |
| Hard Starting | – Difficulty starting, especially when cold |
| Poor Performance at Altitude | – Decreased engine performance at high elevations |
Common DTC Codes Related To MAP Sensors
One common issue with the MAP Sensor is that when it malfunctions, it might not always trigger a fault code. However, if a code does appear, you should be on the lookout for P0105, P0106, P0107, P0108 or P2263. These codes might also manifest as transmission faults or barometric pressure sensor faults.
Locating the MAP Sensor
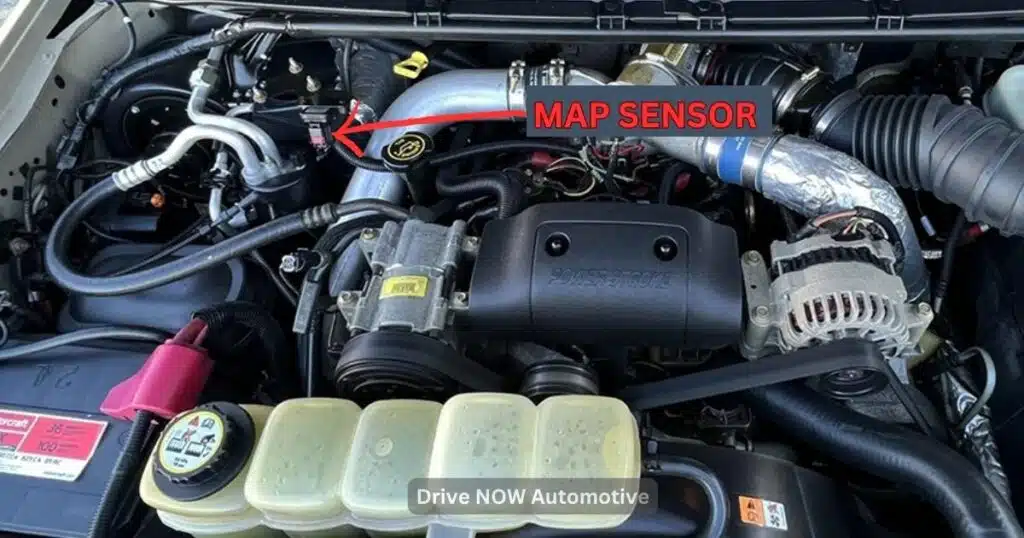
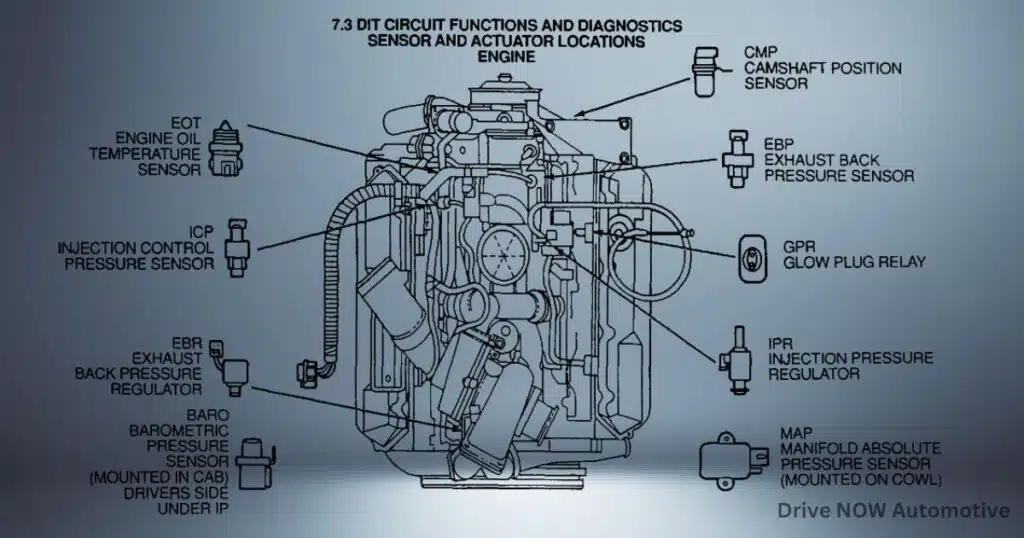
Now that you know the importance of the MAP sensor, let’s locate it in your 7.3 Power Stroke, which applies to models from 1999 to 2003. You’ll find the MAP sensor on the right-hand side of the engine, specifically on the passenger side. It’s secured in place by a bracket.
Identifying the MAP sensor is relatively straightforward. Look for an air supply line that connects to it. In my case, the air supply line was disconnected due to my mishap while installing an intercooler pipe. This line connects from the manifold and is essential for turbocharging.


DIY Testing To Check The MAP Sensor Conditions
Now, let’s address the crucial aspect of testing your MAP Sensor. Follow these steps:
- Start with a visual inspection of the rubber tube connecting to the sensor. Over time, these rubber tubes can deteriorate, leading to cracks or holes. If the tube feels loose or easily turns at the sensor or manifold connection, it’s wise to replace it. This is an inexpensive fix that can significantly improve fuel mileage and overall engine performance.
- Inspect the wires and connectors. Ensure the wires are properly connected to the plug and aren’t cracked or damaged from prolonged use. At the connection point, make sure it’s clean and free of debris or corrosion.
- Testing the sensor while it’s still on the truck is possible. You won’t need to remove it. Here’s what to do:
- Set your 12-volt tester to DC 12-volt mode.
- Connect the black lead of your tester to the battery.
- Attach the red lead to the first pin on the MAP Sensor with the key on, but the engine is not running. You should get a voltage reading of 4.5 to 5 volts.
- Next, connect the red lead to the second pin on the MAP Sensor with the engine running at idle. You should get a voltage reading between 0.5 to 1.5 volts.
- If possible, gradually increase the RPM to 1200 while monitoring the voltage. Any erratic or absent voltage fluctuations indicate a faulty sensor that needs replacement.
Replacing the MAP Sensor in 7.3 Powerstroke
Now, let’s get down to the nitty-gritty of replacing the MAP sensor. Before you start, ensure your vehicle’s battery cables are disconnected to avoid any electrical issues. Here are the steps:
- Removing the Old Sensor: To remove the old MAP sensor, you’ll need a T20 Torx and a pair of pliers. Carefully unscrew the two screws holding the sensor in place. Be cautious not to drop them, as it can be quite challenging to retrieve them in the cramped spaces of vehicles like Excursions. Once the screws are out, gently unplug the electrical connection.
- Installing the New Sensor: Bolt the new MAP sensor into place. These are tapping screws, so be mindful of their direction. Try to start them as straight as possible to avoid damaging the screw threads. Tighten the screws just enough to secure the sensor; there’s no need to over-tighten.
- Reconnecting the Airline: Before reattaching the electrical connection, don’t forget to reattach the air supply line on the other side of the MAP sensor.
- Completing the Installation: Finally, reconnect the electrical portion and put the cover back on. You’ve successfully installed a new MAP sensor, and it’s as easy as that!
Conclusion
In conclusion, the MAP sensor is a critical component of your 7.3 Power Stroke engine. Understanding its function and knowing how to replace it can help ensure your engine runs at its best. Remember to take precautions to avoid common mistakes, like damaging the air supply line.
Last Updated on November 19, 2025 by Rifen
