
Every driver has to deal with the annoying sight of a headlight that is out of focus or simply doesn’t work. To keep your car looking new, check out this simple tutorial for how to clean headlight lenses with household items and cleaning kits.
Plastic headlights lenses can get contaminated by road debris, rocks, dust, UV rays, and acid rains, causing them to dim or lose their intensity. As a result, you will see your car headlight become hazy and foggy and start to have a yellowish tint over time.
The truth is, Foggy headlights can be a real headache. They can interfere with your night vision, and they reduce the visibility of the road ahead. At best, you’ll end up driving into an intersection at night or getting into an accident. At worst, it could lead to a serious car accident that leaves you seriously injured or dead.
Having to replace your headlight lens is an expensive affair. However, it’s one of those things that are pretty much unavoidable if you own a car but don’t have to spend money on it. Luckily, it’s not as hard as you think! Here’s how to clean your headlight lens the easy way!
Disclaimer: We always advise you to seek professional help if you are unsure of what you are doing. For instance, we assume you are confident that you can clean your headlights yourself. Nevertheless, here are some DIY guides for your consideration.
how much is headlight restoration?
If you go to professionals, they will charge you a minimum of $150 to $200 for fixing your headlight. On the other hand, if you want to do it yourself using professional restoration kits, you would have to spend approximately $20 to $50.
In this case, it is cheaper and easier for you to clean your headlights yourself. You will save a lot of money if you know how to do it! And in this guide, we are going to show you how!
Which Are The Best Headlight Restoration Kits
Several headlight restoration kits are available on the market that can help you clean your headlights and restore their luster.
Most of these kits come with a bottle of lens clarifying lubricant, Restoration pad of different grits. They may also include brushes, cloths, and other cleaning tools needed.
We recommend below cleaning kits below to make the restoration process more straightforward.
SYLVANIA – Headlight Restoration Kit, which contains the necessary tools to repair your damaged headlight. It is an easy and convenient way to restore your damaged headlight. The kit consists of these items, namely the surface activator, to soften the plastic surface for easy sanding. It also comes with the Sanding and polishing compound, UV Block Clear Coat applicator, Polish cloth, vinyl glove, and premium sandpaper (400, 1000, and 2000 grit). The kit is very effective in restoring your damaged headlight.
Turtle Wax Headlight Lens Restorer Kit This is another best Kit to clean a headlight lens. The headlight lens is usually made of plastic, and it gets dark over time. This is the main reason why your headlights look dim and dull. This product restores the original light of your headlights by removing the haze from headlight lenses. The kit has 3 pads ranging from 2400 to 8000 grit, 4 oz of spray lubricant, and a wipe for sealing the lens. The sealing wipes help to prevent future discoloration. The kit is ideal for anyone who needs to restore their headlight lenses.
CERAKOTE Ceramic Headlight Restoration is a cleaning and restoration kit that brings headlights back to like the new condition. It is a 3 easy steps product that will help you restore your headlights back to like-new condition. You will get an oxidation-removing wipe, a prep pad that will help remove the deep oxidation, and pre-moistened wipes. These will effectively restore your damaged headlight.
What Is The Reason For Sanding Headlight Lens With Sandpaper? What do We want to Achieve?
Manufacturers put some UV coating to protect the lens from getting yellowish. Still, this coating will fade away over time, and you would notice that the headlight lens is becoming yellowish. So when you clean your headlights with dry sandpaper, it removes all these yellowish colorations, oxidation, dirt, and debris from the lens to reveal the clear plastic underneath.
Wet sanding is basically best for polishing, while dry sanding is used to remove the actual UV coating, scratches, and dust from the headlight lens. You should always use a plastic polishing solution after sanding because it will help you polish your headlights to restore their original color back.
How To Defog A Headlight With sandpaper and restoration kit:
The following steps are also answers of how to use headlight restoration kit if you use any of the above restoration kits since they all contain almost the same products. One thing to remember the below process will not restore the inside problem of the headlight. If you face other problems you may consider replacing the headlights. Luckily we reviewed some of the best aftermarket headlights for 2001 dodge Ram as well as the best aftermarket headlights for Silverado. So if you own one of these and want to read which are the best you can check them.
To defog a headlight lens, you can use sandpaper to remove the dust from the lens. To clean foggy headlights using sandpaper, you need the following items:
- Warm Soapy Water
- 400 to 2500 grit sandpaper
- Protective Tape
- Rubber Gloves
- Polishing Cloths
- Plastic polishing Solution
- isopropyl alcohol
- UV protective coating
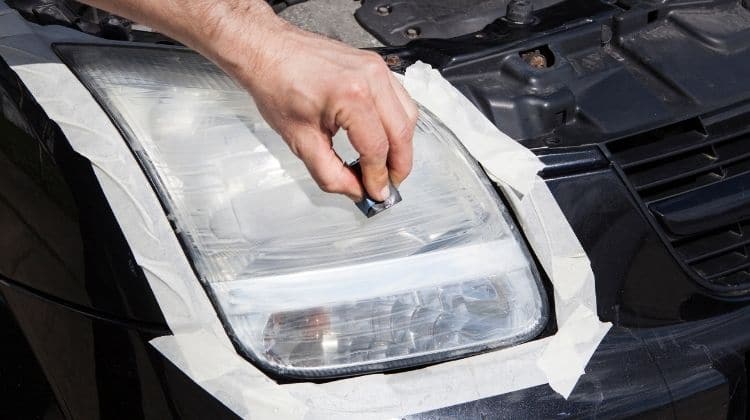
Step 1: First, to prevent scratching on the car’s paint, take the masking tape and cover it around the lens of your car’s headlights. Wear a protective face mask/shield and gloves because dirt and debris can get into your eyes during the sanding process.
Step 2: Next, wash and rinse your headlights with some warm soapy water to remove dirt or debris, and then let it dry.
Step 3: Now, you can take a piece of sandpaper depends on your headlight lens situation. Remember higher grit number means finer abrasive, and a lower grit number means coarser abrasives. So, take a piece of sandpaper with a lower grit rating to remove scratches from the headlight lens, but not too coarse as it will damage the surface of your headlights.
Step 4: Now, initially, we start the sanding process with the 600 grit sandpaper. Do sanding horizontally on the headlight lens to remove any scratches. Keep applying this sandpaper for about 2-5 minutes until you see no more scratches on your headlights.
Step 5: Now repeat the same process with 600 grit vertically on the headlight lens.
Step 6: Now rinse the white milky powder with water and dry it off with a clean cloth.
Step 7: Now, We gonna start with wet sanding. Remember, if you use the 600 grit sandpaper for wet sanding, take the 800 and if you take 800 grit sandpaper for dry sanding, take the 1000 grit. Soak the sandpaper in water and start wet sanding like steps 4 and 5.
Step 7: Once you complete the sanding process, start rinsing the headlight lens with clear normal water and let it dry. You now feel the headlight lens become smooth but still hazy.
Step 8: Now, put the plastic polishing compound on the headlight lens and rub it in a circular motion using the polishing cloth until the lens surface is clear and shining. This can be done more professionally by using the rotary buffer or dual-action polisher.
Step 9: Let the polishing compound dry for about 5 minutes, and then remove the masking tape.
Step 10: Once you are done polishing, take a piece of a soft cloth or the polishing cloth and wipe it over the headlight lens to remove any residue polishing compound.
Step 11: Now, if you have done your polishing work, apply some isopropyl alcohol on the headlight lens and wipe it off with a clean piece of cloth. This will remove any contamination.
Step 12: If you followed all the above steps and are satisfied, you can now apply the UV coating on the headlight lens, and that’s it. You have just completed your DIY Headlight Restoration.
DIY Methods: How To Clean Headlight Lens With Household Items
If the headlight is lightly foggy, you can clean your headlights at home with household items like toothpaste, baby wipes, and baking soda. You can also use dish soap to make soapy water and a soft damp cloth to clean your headlights. Below we illustrate the most effective ways to clean your headlights using household items.
how to clean plastic headlight lens Using Toothpaste:
You don’t need to go out and buy a special cleaner for your headlights if your headlight is slightly foggy. Instead, just use some everyday household items you have lying around the house. Toothpaste is one of them! To clean your headlights, follow these steps:
- First, clean the headlight with water; you can apply soap water on the sponge and gently wipe the headlight lens.
- After cleaning your headlights, remove any soap residue by rubbing a soft cloth or rag until the moisture is completely removed.
- Now apply some toothpaste and rub it on the headlight in circular and side to side motion using a soft paper towel. Let it sit for about 10 minutes.
- Wipe off the toothpaste with a clean cloth Repeat steps 1-3 again if necessary
- When you remove the protective coating, make sure to wipe off all excess toothpaste from the reflector.
- After then the final step is to apply a sealant so that the headlights will be protected from further damage by UV rays.
How To Restore Headlight Lenses Using Baking Soda and White Vinegar To clean the Foggy headlight lens cover.
Foggy headlights can be a serious problem, especially if you’re driving in the dark. If you don’t have the luxury of replacing your headlights, you can use some simple home remedies to clean them. Baking soda and vinegar are great for cleaning cloudy aka foggy headlights since baking soda has abrasive components. To clean your headlights using baking soda and vinegar, follow the steps below.
- First, make a paste of baking soda and vinegar by mixing one part baking soda with two parts vinegar.
- Now clean the headlight with soapy water.
- Take a soft cloth and rub the paste on the headlight lens in circular and side to side motion. Let it sit for about 10 minutes.
- Repeat steps 1-3 again if necessary and wipe off any excess baking soda with a clean cloth.
- Now, apply a sealant to protect your headlights from future fogging up.
How to Clean Oxidized Headlights With WD-40?
Oxidized headlights can leave a lot of streaks, and the lights may appear dim. Cleaning oxidized headlights is a relatively easy task, especially when the lens is completely covered with layers of dirt and grime. Oxidized headlights often appear dull and blurry and can affect your visibility at night. The headlight lens must be cleaned using a special solvent that removes the dirt, grease, and grime. If you’re not familiar with the solvent, don’t worry because WD-40 is a versatile product that can be used for many household tasks. It has lubricating properties, and it also removes dirt, grease, grime, and other contaminants from most surfaces. If you have oxidized headlights, try using the following steps to clean them.
Step 1: Apply protective tape all around the edge of the headlight lens.
Step 2: Use soapy water to clean the lens and wipe it off with a clean cloth.
Step 3: Shake the WD40 bottle and then Spray on the headlight lens and let it sit for about 5 minutes. The product will penetrate into the lens to loosen dirt, grease, grime, and other contaminants.
Step 4: Then clean the headlight with a soft cloth.
Step 5: Repeat steps 3 and 4 if necessary until you see that all of the dirt, grease, grime, and other contaminants have been removed from the lens.
Step 6: Once it’s done, remove all the protective tape and use CleanTools Absorber®, which will help to remove any remaining traces of WD-40.
Step 7: You can use some clear coat sealant after using the product to help restore the shine and protect the lens from future oxidation.
Step 8: Now, your headlights will be cleaned and shiny again!
Disclaimer: Do not clean the headlight frequently with WD40 as it can damage the plastic lenses of your headlights.
How To Clean Foggy Headlight Lenses Usning Bug Spray To Restore Foggy Headlight
Bug spray can also be used to clean a headlight lens. If you do not have toothpaste, vinegar, or soda, you can use bug spray to clean your headlights.
To clean a headlight using bug spray, follow the steps below:
Spray a small amount of bug spray on the surface of the headlight lens and wipe it off with a soft cloth. Do not over-spray the bug spray as it can damage the headlight lens cover.
What Are The Different Parts of Headlights
Headlights may be a common sight on the road, but a closer look at them will reveal a lot about their inner workings. All headlights mainly 3 basic parts: The bulb, The reflector, and the headlight lens. The bulb is responsible for emitting light and warmth to your eyes. The most popular brightest Halogen and LED headlight bulbs sizes are 9012 LED headlight bulbs, H11/H9/H8 LED Headlight Bulbs, 3057 and 3157 bulbs, and others. At the same time, the reflector has a concave shape and reflects light away from the bulb towards the road. Finally, the third part is the headlight lens which is made with a polycarbonate plastic material. (source)
Why Do Headlights Get Foggy? Why Don’t They Shine Through?
There are many reasons why headlights can get foggy, but most have to do with contamination on the lenses. It can be from water or dirt or even UV rays from direct sunlight. As you already know headlight lens is made from polycarbonate plastic material. These are way better than glass lenses, but over time when this plastic lens gets UV light exposure from direct sunlight, the outer layer of the plastic starts to degrade. This is when your headlights will start to show signs of fogging up.
To prevent this from happening, try to not park your car in direct sunlight. This will prevent UV light from entering the lens, which is one of the main reasons why headlights get foggy. Another reason is if you have an older vehicle with a bulb that has not been replaced for quite some time. If you have not replaced your bulb for a while, it is time to do so. Replacing the bulb will give you brighter and cleaner light output, which is essential in preventing fogging up of headlights.
Also, it is recommended to clean your headlights at least once a week with soapy water. Another way to make sure that the lenses are not getting foggy is by wiping them off with a dry cloth after driving in wet weather or rain.
Conclusion
Headlights are the most important part of your car. They allow you to see clearly in front of you, but they can also be a source of frustration if they are not working properly. You should have them checked every once in a while, but you should also take precautions to prevent them from getting foggy. This will help keep them free from foggy lenses that can cause headaches for everyone on the road!
Last Updated on May 17, 2026 by Rifen