
Ball joints are one of the most commonly used suspension parts in the automotive industry. They are cheap, easy to replace, and when it comes to maintenance, they require less effort than other components. Here’s how to use ball joint press to change your upper and lower ball joints with ease.
Ball joints have the tough task of sustaining impacts from potholes, bumps as well as braking and starting pressure. As such, ball joints don’t last forever and will need to be replaced after some time.
If you have never replaced your ball joints, chances are that the control arm is pressed. The manufacturer did this, and most vehicles feature a pressed control arm. Unlike aftermarket bolt-on joints, these stock ones will require a ball joint removal tool.
So in this article, we are going to look at how to Use a Ball Joint Press kit. The main reason is that it will save you time and money. There are many types of ball joint press available on the market, but one of the main things to keep in mind before buying is that the kit you will use should be compatible with your vehicle. So check the manufacturer specifications and compatibility.
Make sure after you purchase any basic ball joint kit, you will get these components with it. They are:
- The ball joint press tool comes as a C frame with a forcing screw
- installing and receiving cups
- Receiving tubes with different sizes, and
- Some Adapters also comes in various sizes
You can use one of these recommended ball joint press kits.

Please note that Prices and Availability Are Subject To Change
How To Use Ball Joint Press For Replacing Ball Joints
Like how to change ball joints on chevy 1500 4X4 here we also demonstrate how to use a ball joint press for removing the old ball joint and installing the newer ones for any vehicle. The process is quite straightforward please follow the steps below.
Before Removing Ball Joints First Check The Ball Joints Condition
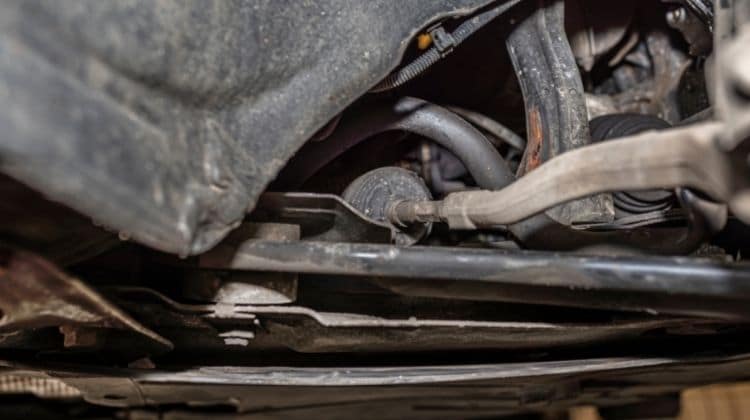
Before removing the ball joints, we need to check if they need removing in the first place. This entails checking the condition of the upper ball joint as well as the lower joint.
The only tool we are going to require for this task is a flashlight. Use the flashlight to inspect the physical condition of the joints. Check for signs of damage and any broken parts.
If you notice that the ball joint is broken, this will be the end of the inspection. Never try and test drive a car with a broken lower or upper ball joint; this will ultimately lead to them coming off. If you are using jeep jk you can check our recommended best ball joints for jeep jk to replace the old one.
On the other hand, if you notice the ball joints are still intact, it is time to proceed to step two, which is to do a test drive.
Drive the car and listen for any unusual clunking sounds or vibrations. Strange clunking noises or vibrations will be a sign of damaged ball joints.
Next, we need to re-inspect the ball joints with our flashlight again. At this stage, you will be able to know conclusively whether they need replacing or not. Assuming they do, we can then proceed to how to use a ball joint press to remove ball joints. In our case, we changed the ball joint for Dodge Ram 2500 4×4, You can learn more about the experience we encounter and find which one is the best ball joint for Dodge Ram 2500 & 3500 4×4 from our guide.
How To Remove Ball Joints Using The Ball Joint Press
Now we come to the vital part of how to remove ball joints using a ball joint press kit. To accomplish this, we are going to need some tools. The tools we will require are;
- Removal press kit (including C-clamp and adapters)
- Socket, ratchet, torque, and extension wrenches
- Socket air tools
- Needle nose pliers
- Screwdrivers
- Tire iron
- Side cutters
- Axle press
- Hammer
- Shop towels
- Rust penetrate
- Hammer 2 1/2 pound
- Jack stands
- Wheel chocks
- torque wrench
- pickle fork
Step one: Prepare the vehicle.
The first thing we need to do is park the vehicle on a hard flat surface. If it is an automatic transmission, ensure it is in the park mode. If it is a manual transmission, ensure it is in the first gear.
Next, we need to secure the rear tires. To do this, we will use wheel chocks wrapped around the back tires since they will remain on the ground. Since the vehicle is on a flat surface state, the wheel chocks on both sides of the rear wheels.
Step two: raise the vehicle
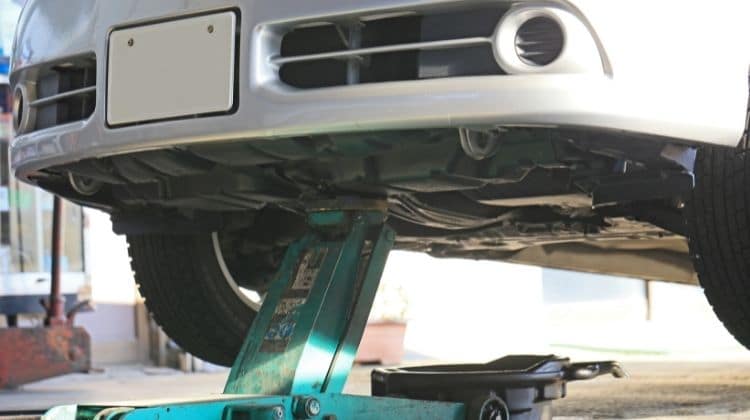
Next, use a floor jack to raise the vehicle. If the floor jack is not good, use a piece of wood underneath the jack. Ideally, it would be best to use a floor jack recommended by the manufacturer, which can withstand the car’s weight. Next, lift the vehicle at its jacking points under the wheels are off the ground. Then place the jack stands under the jacking location.
Step three: Remove the wheels, Brake Caliper, And Brake Rotors

Remove the wheels from the wheel studs. You will also need to remove the brake caliper for some vehicle models. First, disconnect the brake caliper and hang it on the frame or coil spring using a bungee cord. Next, we will have to remove the brake rotor as well. If it’s stubborn use rotor wedge screws to get it out from the wheel hub.
If your vehicle has pressed in bearings and the hubs have bolts, you will need a tire iron to remove the lug nuts from the wheel studs. Once this is done, remove the wheel from the wheel studs. When removing the front wheel studs, you will need to remove the brakes as well.
Remove the brake rotor as well. This process may require the use of rotor wedge screws to force the rotor off from the wheel hub.
When removing the wheel studs, it is important to have safety glasses on. These glasses will shield your eyes from any flying debris from removing the wheel studs. The wheel studs will typically have dirt on them, so that cleaning may be necessary.
After removing the brake caliper and rotor we have to disconnect the tie rod from the steering knuckle.
Step four: Remove the fastening nut
For how to remove the lower ball joint, first remove the fastening tie nut. Remember don’t take off the tie nut completely. Use a hammer and tap the tie nut. Next, remove the axle nut using a socket and impact wrench. The next step will involve separating the ball joint from the lower control arm.
For the upper joint, you will have to locate the upper control arm. You will find this upper control arm typically at the top of the car’s front suspension system.
For this process, we are going to use a 5pc ball joint separator tool. You should hear when the joint stud pops from the lower control arm. Push back the axle nut through the hub assembly. Use an axle press tool to push the axle nut.
Next, push the steering knuckle and assembly while leaving the cv joint in place. Again, you may have to prop up the axle shaft to have more room. (source)
Step Five: Remove the rubber boot
Use a screwdriver and a hammer to knock off the rubber boot. Clean the ball joint. It is advisable to use compressed air, a wire brush to clean. Furthermore, we recommend applying a penetrating fluid to make the removal process easier.
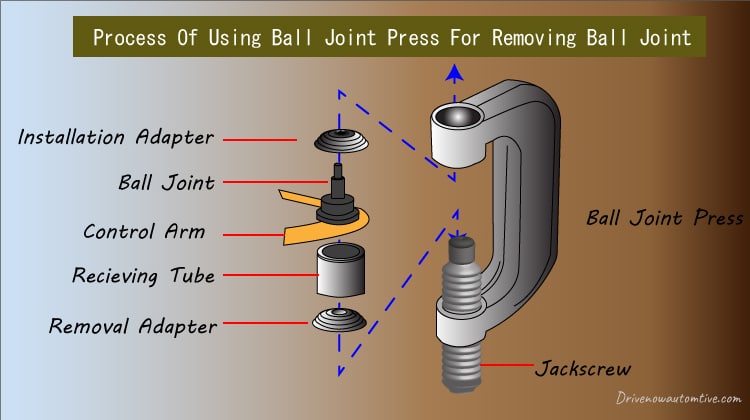
Step Six: Process of Using ball joint Press For removing Ball Joints
Inside the ball joint press kit, you will find two adapters. One is longer and narrower than the other, which is shorter and wider. Position the longer adapter on top and the shorter one below it.
It is worth noting that when working on a 4 wheel drive car, you will need a press kit with 4wd adapters. These adapters are different from those used in 2 wheel drive cars. The ball joint press tool will also feature a c-clamp. This c clamp is what you will use to remove the ball joint.
The first thing to remove the ball joint is to remove the snap ring or seal clip from the ball joint. Then remove the grease fittings.
Now place the removal cup found in the ball joint kit over the top of the new ball joint where the threads are located. Now place the two 2wd or 4wd adapters over the removal cup Next over the entire setup place the forcing screw which you get with the kit. Now tightening the forcing screw until it reaches the bottom of the ball joint.
If all is perfectly aligned and positioned find a socket that fits and use it to press the c-clamp inwards. The ball joint should come off now. Remove the top and lower adapters to retrieve the removed joint.
How To Install A New Ball Joint Using The Ball Joint Press
Now that we have removed the damaged or broken ball joint, it is time to discuss how to install it using the press. We first need to check whether the old and new ball joints match in terms of components to ensure we are installing the right one. Remember all the ball joints for jeep TJ are not compatible with its close match Jeep Jk. So before buying the ball joints you must check the compatibility.
Also, it is advisable to clean the knuckle hole and apply grease or lubricant before installing the new joint.
Step one: insert a new ball joint.
Once we have verified that it is the right ball joint, we will insert it into the knuckle hole. When doing this, make sure it is level and thoroughly check the alignment. The ball joint press kit will also have an upper adapter that you place on top and the other you put at the bottom.
As for the lower adapter, place it on the joint screw of the c-clamp and wind it upwards by hand. While doing this, make sure the ball joint is secure. Then, use an impact socket wrench to press it in.
Once it is securely in place, remove the c-clamp press. Check that the rubber boot and threads are all intact. Next, reattach the axle shaft back into the wheel bearing as well as the brake caliper.
Apply rust penetrant on the axle shaft to make it slide in easily. Then install the ball joint into the control arm. Once this is done, install the fastening nut and cotter pin and then reinstall the axle nut.
Once this is done, reinstall the wheels with the wheel studs as well. Of course, you can replace the wheel studs if altogether as well. However, you can reuse the wheel studs you removed if they are still intact.
Frequently Asked Questions
How many times can I replace a ball joint on the same vehicle?
There is no limit on how many times you can replace ball joints. However, some manufacturers do recommend replacing the knuckle also if replacing ball joints for a third time.
What should I look for when inspecting a ball joint?
A visual inspection of the ball joint will not be enough to know whether a ball joint is worn out or not. A test drive will be necessary. A foul ball joint will lead to a creaking noise coming out of the front of the car when it hits a bump. Also, you will notice that the steering system feels loose.
What are the types of ball joints?
There are two main types, compressed and decompressed. Compressed ones feature a control arm attached to the bottom of the hub. The downside to this type is that the control arm will detach from the hub rendering the car inoperable when it fails. On the other hand, the decompressed joint features a control arm attached to the top of the hub. In case the ball joint fails, the control arm stays attached to the hub.
How much torque is needed to press out a Lower ball joint?
It’s not uncommon for people to underestimate the amount of torque needed to remove a ball joint. This is why it is best to use a manual ball joint press in order to get accurate measurements on how much force needs to be applied. In this case, you can estimate that around 35 ft-lbs of torque should be enough to press out a ball joint.
Is it possible to change the ball joint without a press?
Yes! It’s possible by using a hammer. But removing the ball joint without press may cause other damage during the removal process. To learn more you check this post: How To Remove A Ball Joint Without A Press.
Conclusion
Ball joints are constantly exposed to debris, dirt, and pressure. As such, they are vulnerable to wear and tear. And while some can go for up to 160 miles before being worn out, the truth is all ball joints will require replacing at some point.
Using a ball joint press to remove a bad ball joint is recommended as it leaves the ball joints intact and makes the whole process easier and safer.
Last Updated on May 23, 2026 by Rifen